| You are in: Observing Tool (OT) > Science Program > Elements > OT Components and Iterators > OT bHROS |
|
High-Resolution Optical Spectrograph (bHROS)
|
Since most bHROS programs will share many aspects of configuration in the Observing Tool, a step-by-step guide for creating Phase II programs has been created. This guidebook builds upon the base observations configured within the bHROS example OT library.
The bHROS Guide to Phase II Programs (this document) is also available for download (2 MB pdf file). The contents of this document are:
The purpose of this guide is to aid in the construction of bHROS Phase II programs. The instrument has few configurable options and most observational programs will be very similar in construction. To make the process of creating Phase II programs easier for PIs, we have created a bHROS sample OT library containing the foundation for most bHROS programs. This guide builds upon this library and goes through the steps necessary to customize this library to your program.

The sample library used in this guide is available from the bHROS OT library. This library can be fetched directly within the OT. Select "File | Fetch..." from the menu bar with the OT. Enter '123456' as the program key and select the Gemini South database in the Database Fetch Assistant window. Press the right arrow to proceed and enter 'GS-bHROS-library' as the Program Reference. Click the 'Fetch' button to retrieve the sample library. The sample library contains three main sections visible in the Science program viewer: the science observation, the acquisition sequence, and daytime calibrations.
Make sure that the correct contact information is entered; including name, affiliation, phone and email.

Next, we will complete the science observation portion of the program. Select the observation, labeled "Sample bHROS Observation".

Set the Observation Name and the Priority of your target within your program.
Now select the Observing Conditions for your science program.

The observing conditions should be set to those within your Phase I proposal. However, if your science can be achieved with more lenient observing condition constraints, you should consider relaxing the constraints to improve the chances of your observation occurring. Remember, any changes to stricter restraints require approval from the observatory. For more details, refer to the change control process. More information on the observing condition constraints can be found in the observing condition pages.
Now select the bHROS Component of the science observation. The bHROS component contains the main instrument configuration settings.

The instrument component contains the following items that need to be configured for your program:
Position Angle: The position angle will be set during selection of the guide star.
Exposure Time: The exposure time for your individual science exposures can be set here. The appropriate exposure time can be determined using the information available on the bHROS Sensitivity page.
Entrance Fiber: Select either the single (Object Only) fiber mode or dual (Object-Sky) fiber mode configuration.
Post-Slit Filter: If your program requires a post-slit filter, select the appropriate one here.
Hartmann Flap: The is used for instrument focusing and should be set to none for your program (the default setting).
ISS Port: This should be left at the default setting, Side Looking.
Exposure Meter Filter: The exposure meter is used to monitor count rates during the observation in case of variation due to clouds, seeing, target drift, etc. This should normally be set to the filter that best matches your target wavelength. However, in the case of bright (4th mag) targets, the neutral density (ND) filter should be used to prevent damaging the exposure meter. The system automatically places the ND filter in place for calibration images. For faint targets (13th mag) the clear filter selection should be used to ensure enough counts.
CCD Parameters:
Echelle Parameters: The echelle parameters determine which part of the echellogram is place on the detector. The echelle is configured interactively by selecting the Configure Echelle button in the OT. The following window will open.

The Echelle Spectrograph Configuration window displays a model of the echellogram produced by the instrument and overlays the footprint of the detector. The instrument configuration and the display is controlled by the following:
Zoom: The field-of-view can be adjusted using the Zoom slider.
Reference Lines: The position of reference lines can be displayed on the echellogram to aid in the placement of the detector. Several lines of astronomical interest can be displayed by selecting Astronomical as shown in the image above. User defined lines can also be displayed by selecting User File and loading a user-supplied file. The user file should contain a wavelength (in Angstroms) and label on each line as in the following example.
5555.5 Adamantium
6666.6 Mithril
5888.2 Scrith
6789.0 Unobtainium
9876.5 Promethium
7777.7 Uru
Tracking Wavelength: The desired central wavelength can be entered by clicking on Tracking Wavelength and entering the central wavelength (nm) in the dialog box. Additionally, the tracking wavelength can be set by clicking anywhere on the echellogram with the mouse pointer.
Target Position: The position of the echellogram on the detector can be fined-tuned by using the directional buttons within the Target Position box.
When you are satisfied the echelle configuration, select the OK button to return to the bHROS component screen. Selecting Cancel will return to the bHROS component without make any changes to the instrument configuration.
Next, select the target component of the science program.

Enter the Name, RA, Dec, Brightness and Proper Motion of the science target. Also make sure to select the proper coordinate system. It is also possible to retrieve this information by entering the objects name and clicking Resolve Name. The OT will attempt to query the name server chosen in the Name Server pull down menu.
Now we will select the guide star for this observation. Select the Image button to bring up the position editor.

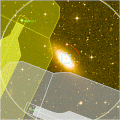
To load up the appropriate background image, select Catalog | Image Servers in the Menu bar and select an image server. If you are not satisfied with the image displayed, use another image server (with a different survey image).
The View options on the left sidebar of the Position editor control the overlays visible in the display window. For selecting our guide star, Base, Catalog, OIWFS FOV and Sci FOV should be selected.
Adjusting Target Position: Should the target position or sky fiber placement need adjustment, select Drag from the Mode: options on the left sidebar and drag the blue Sci FOV to the appropriate location. The targets coordinates will also be updated automatically within the Target component of the OT. The sky fiber position can be adjusted by dragging (in Drag mode) the small blue arrow near the science target. This will allow you to rotate the sky fiber position about the science fiber. When finished, return to Browse mode.
Finding Guide Stars: Now bring up the Catalog Navigator window by selecting the Catalogs button on the toolbar of the Position Editor. Then load an appropriate guide star catalog by selecting Catalogs | Catalogs from the Menu Bar and selecting a guide star catalog. The Guide Star Catalog is usually the best option for selecting guide stars for use with the GMOS-S OIWFS that bHROS uses for guiding. Each star in the catalog will be highlighted in our image. Clicking on the highlighted objects in the Browse mode will highlight the matching information in the Catalog Navigator, as shown below.

Guide stars must lie within the red-dashed box that indicates the field-of-view for the GMOS-S OIWFS. The position angle of the OIWFS FOV can be adjusted by changing the Mode: (in the sidebar) to Drag and dragging the blue arrow next to the our science target to reach more guide stars. The position angle can also be changed to specific values within the bHROS component.
In general, it is advised to use the brightest guide star available for your target. Guide stars generally need to be brighter than V~14.5mag. If observing conditions are poor (clouds, poor seeing, strong winds), the limiting magnitude for the guide star will be brighter. If your guide star is too faint, your target may not be observable, even if your observing condition constraints are met!
Once an appropriate guide star has been chosen, we can select it within the Position Editor. First, select OIWFS under Add: in the sidebar. Then click on the desired guide star within the image. The coordinates of the star will be automatically added to the Target component or the OT and the outline of the OIWFS will be added in the position editor as shown below. The Position Editor and Catalog Navigator can now be closed.


The sample base Sequence Component contains a ThAr arc, a quartz halogen Flat and the actual target observations.
WAVELENGTH CALIBRATION: The arc spectrum is produced using the following settings: The ThAr arc lamp, the visible diffuser and a single exposure of 150 seconds.

FLAT FIELD CALIBRATION: The Flat spectrum is produced using the following settings: The quartz halogen lamp, the visible diffuser and an exposure of 100 seconds. Depending on the signal-to-noise requirements of the science observation, the exposure time for the flat may need adjustment. The GCAL quartz halogen lamp acts like a 4.5mag source and the exposure time necessary to meet your SNR requirements can be determined from the information on the bHROS Sensitivity page.

SCIENCE EXPOSURES: Finally, the number of science exposures (each with an exposure time as set within the bHROS component earlier) is set within the Observe Sequence Component.

BUILDING (SOMEWHAT) MORE COMPLICATED SEQUENCES: More complicated sequences can be built by adding additional arcs and observe components to the sequence. To add an additional arc, select Flat/Arc from the Observe item in the sidebar. The component will need to be configured as the arc in the sample library. Additional science observations can be added by selecting Observe from the Observe item in the sidebar.
The science observation is now complete and the acquisition sequence must be completed.

Position Angle: Set this to the same value used in the bHROS component.
Filter and Exposure Time: The exposure time and filter need to be set appropriately for the acquisition image. See the table below to determine the appropriate values for your target.
ACQUISITION IMAGE EXPOSURE TIMES AND FILTERS
V Magnitude |
Exposure Time (seconds) |
Filter |
| 3 | 1 | u_G0332 |
| 5 | 1 | u_G0332 |
| 7 | 1 | Ha_G0336 |
| 8 | 2 | Ha_G0336 |
| 10 | 10 | Ha_G0336 |
| 12 | 30 | Ha_G0336 |
| 14 | 30 | r_G0326 |
Focal Plane Unit: This should be set to bHROS.
CCD Readout: 1x1 binning and fast readout should be selected.
Regions of Interest: Select the Regions of Interest tab and choose CCD2.


Tellurics: Telluric observations are included as part of the baseline calibration but only if requested by the PI. If you are requesting observation of a telluric standard as part of your program, two appropriate standards (i.e. with appropriate spectral type, airmass, etc.) should be selected; one that can be observed before the science observation and one that can be observed after. The observer will select one of the standards to observe. Make sure to label each standard and create observations and acquisition sequences for both.
Other Standards: Other standard star observations (spectrophotometric, radial velocity, etc.) are NOT included as part of the baseline calibrations. Any such observations (with the proper time allocation) need to be explicitly included in the phase II program.
![]()
![]()
Last update: December 12, 2005; Steven Margheim