| You are in: Observing Tool (OT) > Science Program > Elements > OT Components and Iterators > Offset Iterator |
|
Telescope Offset Iterator |
The offset iterator provides a convenient means to specify telescope sequences e.g. mosaics, dithers, nods. The main features of the offset iterator are identified in the figure below:
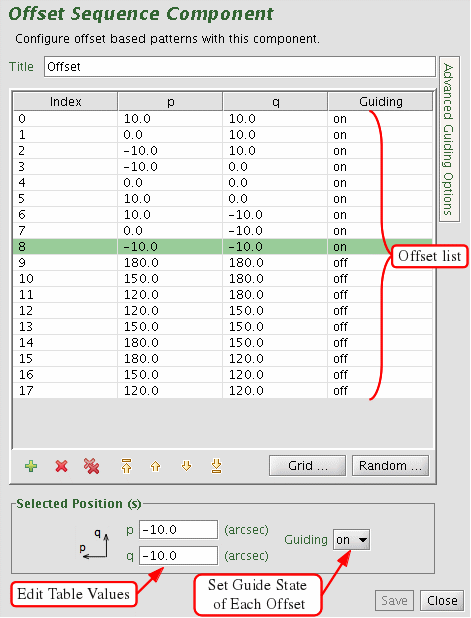
The co-ordinate system for offsets is defined as (p,q) where q is always parallel to the detector columns (or spectrograph slit) and p to detector rows (or orthogonal to the slit). The sketch in the upper left corner of the offset iterator is a useful reminder. Offsets are always entered in arcsec relative to the base position. For example, using a long-slit spectrograph like GMOS or GNIRS, an offset of (0,q) where q is any real number is always along the slit regardless of the position angle on the sky.
This (p,q) co-ordinate frame, and the offset positions, rotates with the image rotator. Thus only one mosaic is required regardless of the specified position angle. Similarly, if the base position is moved (i.e. translated) the offsets will move with it. With an offset pattern displayed in the position editor, you can drag the instrument rotation angle or base position to see this behaviour.
The concept behind the telescope offset iterator is similar to the instrument iterators. You build up a sequence of telescope offset positions in an iteration table. The table columns are (a) step #, (b) (p,q) offsets in arcsec and (c) associated WFS tags. Table rows correspond to iterator steps. At run time, all the values in a row are set at once.
As many offset positions as desired can be entered and the ordering of the list (the execution
order) can subsequently be modified using the arrow buttons. The selected offset,
highlighted in green, can be moved up or down one step using the double arrows or to the
top or bottom of the list. You can select and display (or re-order) multiple steps at once. To select several adjacent steps, click
on the first one in the iteration table then shift+click on the last one; all steps in between will be selected
(highlighted). To select non-contiguous steps ("disjoint sections"), select the first step and then
ctrl+click on any others that you wish to select. The position editor (View menu, Base Position Offset
Display, Science Area, Selected Position) overlay and the iteration table arrow buttons work in the
same way as for individual steps.
Steps in the list can be removed individually (remove button), en masse (remove all button) or new ones added (new button). The values of a particular (highlighted) offset can be changed using the p and q editing boxes. Often it will be more convenient to change offset co-ordinates interactively in the position editor by dragging any offset as the science fields of view corresponding to the offsets and WFS probe vignetting are also displayed.
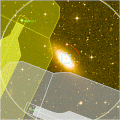
The lower panel in the offset iterator allows rapid creation of rectangular grid patterns. Set the offset of the initial position, spacing and grid dimensions then select create. Subsequent grids (e.g. to map an area of nearby sky) can be appended to the offset list. The order of steps in the list can be modified as described above to create arbitrarily complex patterns. Sequences of random offsets (that populate a square of the specified maximum offset in p,q) can be created in a similar way.
The wavefront sensor probes often have only a limited field over which they can be moved without vignetting the science area of interest (or each other). To overcome this limitation it is possible define multiple guide stars and assign each guide star to one or more offset positions (except in the case of the AOWFS). The (WFS) guide star positions are identified with tags (e.g. PWFS1-3), are listed in the telescope component and are available in the offset iterator via the WFS pull-down menus. To assign a guide star, select the iterator step and select the desired tag from the appropriate menu.
If there are steps in the offset table whose WFS assignment is listed as "freeze" this means that the WFS will not be moved from its previous position (i.e. it will not compensate for the telescope offset and will not attempt to stay locked on the star). This is useful if you wish to maintain the same illumination (vignetting) pattern on the detector e.g. for sky frames. If there are steps in the offset table whose WFS assignment is listed as "park" this means that the WFS is retracted from the field of view. A "parked" WFS is not displayed in the position editor.
To help speed up the process of assigning WFS tags to offset positions, if the column previously contains only "freeze" tags then they are all replaced with the currently-selected WFS tag.
From the offset iterator it is possible to step through the sequence and display the science area and WFS probe positions in a (rudimentary) 'playback' mode:
The apply button accepts the latest changes and stores the program to the local database, the undo/redo button (and, transiently, the edit pencil) toggles unsaved changes and the close button closes the science program editor (saving any changes to the local database).
![]()
![]()
Last update July 9, 2002; Phil Puxley