| You are in: Observing Tool (OT) > Science Program > Position Editor > Buttons |
|
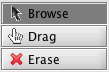
Position Editor Buttons |
Click on the name in the following table to jump down the page for further details. If a function is unavailable (e.g. because there is no instrument or no offset sequence) then the relevant button appears grey in the position editor.
| Mode | Add | View | |||
 |
Browse | 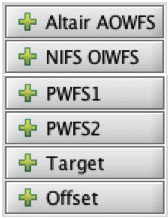 |
PWFS1 | 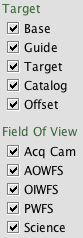 |
Base |
| Drag | PWFS2 | WFS | |||
| Erase | OIWFS | Target | |||
| AOWFS | Catalog | ||||
| Offset | Offset | ||||
| PWFS FOV | |||||
| OIWFS FOV | |||||
| AOWFS FOV | |||||
| Sci FOV | |||||
| Acq Cam |
Moving the cursor over the position editor viewer displays the co-ordinate information at the bottom of the screen. You cannot drag or erase objects in the viewer (it is safe!). The normal cursor shape is unchanged (usually an arrow).
This mode is used to modify target co-ordinates and orientation. The cursor is hand-shaped when in this mode and positioned over an object that can be dragged.
With a base, WFS star or offset position displayed in the viewer you can click-and-drag the object to a new position. With the science field of view (sci area) displayed, click-and-drag it's handle to rotate the instrument position angle. The respective 'handles' to grab are:
| base - click and drag yellow 'earth' symbol | |
| PWFS1, PWFS2 or OIWFS - click and drag green box | |
| offset - click and drag (numbered) yellow circle | |
| position angle - click and drag blue triangle |
The base position may often be obscured by the offset sequence. If this case, deselect the offset view. The NIRI f/6 camera and the acquisition camera have a very similar field of view; you may need to deselect the acquisition camera view to see the NIRI science field.
![]() Moving
these objects changes their co-ordinates in the telescope (base, WFS),
offset sequence iterator (offsets) or instrument (position angle) components of your
Science Program. The new co-ordinates are derived from the background image so beware when
moving WFS probes that require the astrometric accuracy of a guide star catalogue.
Moving
these objects changes their co-ordinates in the telescope (base, WFS),
offset sequence iterator (offsets) or instrument (position angle) components of your
Science Program. The new co-ordinates are derived from the background image so beware when
moving WFS probes that require the astrometric accuracy of a guide star catalogue.
When the base position is moved, other relevant parameters (e.g. WFS patrol field of view, offset sequences) will also move.
This mode is used to delete offset or WFS positions. The cursor is I-shaped when in this mode and positioned over an object that can be deleted.
With the WFS or offset positions displayed in the viewer, position the cursor over the object 'handle' and click to delete (see drag mode for the handles). Holding down the left mouse down and 'wiping' the cursor like an eraser is also effective. Deleting objects from the viewer also deletes them from the telescope targets component or offset sequence iterator.
Offset and WFS positions can also be deleted using the offset iterator and target components in the Science Program.
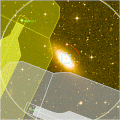
Clicking on the image takes the (+ shaped) cursor co-ordinates and adds them to the target list in the Science Program target component. If the image is overlayed with a catalogue (e.g. of guide stars) then the co-ordinates are taken from the catalogue and do not rely on the accuracy of the image co-ordinates. In the latter case, the cursor need not be positioned precisely, within the square catalogue overlay box is sufficient:
| co-ordinates taken from image because star not in catalogue (and thus relies on image co-ordinate system accuracy) | |
| co-ordinates taken from catalogue because cursor is inside catalogue overlay box |
The co-ordinates are assigned a tag that associates them with Peripheral Wavefront Sensor #1, i.e. PWFS1-n where n is a unique integer. Multiple positions can be associated with each wavefront sensor if different guide stars are required to execute a particular dither/mosaic pattern (use the offset iterator to assign WFS stars to offset positions). If the view PWFS1 button is selected (this occurs automatically when add PWFS1 is selected) then a green box is drawn at the the target location and is labelled with the tag ID.
![]() At present there is no
checking that the selected PWFS star is within the PWFS patrol field and will not cause
vignetting of the science field or another WFS. You should display the
WFS and sci area fields of view to confirm this visually. There is no
checking that the selected star is sufficiently bright for the selected WFS.
At present there is no
checking that the selected PWFS star is within the PWFS patrol field and will not cause
vignetting of the science field or another WFS. You should display the
WFS and sci area fields of view to confirm this visually. There is no
checking that the selected star is sufficiently bright for the selected WFS.
Clicking on the image takes the (+ shaped) cursor co-ordinates and adds them to the target list in the Science Program target component. If the image is overlayed with a catalogue (e.g. of guide stars) then the co-ordinates are taken from the catalogue and do not rely on the accuracy of the image co-ordinates. In the latter case, the cursor need not be positioned precisely, within the square catalogue overlay box is sufficient:
| co-ordinates taken from image because star not in catalogue (and thus relies on image co-ordinate system accuracy) | |
| co-ordinates taken from catalogue because cursor is inside catalogue overlay box |
The co-ordinates are assigned a tag that associates them with Peripheral Wavefront Sensor #2, i.e. PWFS2-n where n is a unique integer. Multiple positions can be associated with each wavefront sensor if different guide stars are required to execute a particular dither/mosaic pattern (use the offset iterator to assign WFS stars to offset positions). If the view PWFS2 button is selected (this occurs automatically when add PWFS2 is selected) then a green box is drawn at the the target location and is labelled with the tag ID.
![]() At present there is no
checking that the selected PWFS star is within the PWFS patrol field and will not cause
vignetting of the science field or another WFS. You should display the
WFS and sci area fields of view to confirm this visually. There is no
checking that the selected star is sufficiently bright for the selected WFS.
At present there is no
checking that the selected PWFS star is within the PWFS patrol field and will not cause
vignetting of the science field or another WFS. You should display the
WFS and sci area fields of view to confirm this visually. There is no
checking that the selected star is sufficiently bright for the selected WFS.
Clicking on the image takes the (+ shaped) cursor co-ordinates and adds them to the target list in the Science Program target component. If the image is overlayed with a catalogue (e.g. of guide stars) then the co-ordinates are taken from the catalogue and do not rely on the accuracy of the image co-ordinates. In the latter case, the cursor need not be positioned precisely, within the square catalogue overlay box is sufficient:
| co-ordinates taken from image because star not in catalogue (and thus relies on image co-ordinate system accuracy) | |
| co-ordinates taken from catalogue because cursor is inside catalogue overlay box |
The co-ordinates are assigned a tag that associates them with the On-Instrument Wavefront Sensor, i.e. OIWFS-n where n is a unique integer. Multiple positions can be associated with each wavefront sensor if different guide stars are required to execute a particular dither/mosaic pattern (use the offset iterator to assign WFS stars to offset positions). If the view OIWFS button is selected (this occurs automatically when add OIWFS is selected) then a green box is drawn at the the target location and is labelled with the tag ID.
![]() At present there is no
checking that the selected OIWFS star is
within the OIWFS patrol field. You should display the WFS and sci area
fields of view to confirm this visually. There is no checking that the
selected star is sufficiently bright for the selected WFS.
At present there is no
checking that the selected OIWFS star is
within the OIWFS patrol field. You should display the WFS and sci area
fields of view to confirm this visually. There is no checking that the
selected star is sufficiently bright for the selected WFS.
Clicking on the image takes the (+ shaped) cursor co-ordinates and adds them to the target list in the Science Program target component. If the image is overlayed with a catalogue (e.g. of guide stars) then the co-ordinates are taken from the catalogue and do not rely on the accuracy of the image co-ordinates. In the latter case, the cursor need not be positioned precisely, within the square catalogue overlay box is sufficient:
| co-ordinates taken from image because star not in catalogue (and thus relies on image co-ordinate system accuracy) | |
| co-ordinates taken from catalogue because cursor is inside catalogue overlay box |
The co-ordinates are assigned a tag that associates them with the Adaptive Optics Wavefront Sensor, i.e. AOWFS-n where n is a unique integer. Multiple positions (tags) can be associated with the wavefront sensor although only one can be used for any individual observation (use the Altair Adaptive Optics component to assign which WFS tag to use). If the view AOWFS button is selected (this occurs automatically when add AOWFS is selected) then a green box is drawn at the the target location and is labelled with the tag ID.
![]() At present there is no
checking that the selected AOWFS star is
within the Altair patrol field. You should display the WFS and sci area
fields of view to confirm this visually. There is no checking that the
selected star is sufficiently bright for the selected WFS.
At present there is no
checking that the selected AOWFS star is
within the Altair patrol field. You should display the WFS and sci area
fields of view to confirm this visually. There is no checking that the
selected star is sufficiently bright for the selected WFS.
Clicking on the image adds the location of the (+ shaped) cursor to the list of offsets in the offset sequence iterator. The offset is the difference in arcsec between the cursor and base positions in the (p,q) co-ordinate frame (see the iterator page for more details on p,q co-ords).
If the view offset button is selected, the viewer shows the new offset (as a yellow circle) optionally labelled with the offset list tag number and the science area. The offset display is configured from the view...offset display item on the menu bar.
![]() This button is inactive if
there is no offset sequence iterator in the observation.
This button is inactive if
there is no offset sequence iterator in the observation.
Displays the base position (as a yellow earth symbol; can be hard to see against a bright object) taken from the target component. With view base selected, the view offset button shows any science instrument offset positions that are defined in the offset sequence iterator.
![]() This button is inactive in
the unlikely event that there is no target component in the observation.
This button is inactive in
the unlikely event that there is no target component in the observation.
Displays any PWFS or OIWFS co-ordinates and tags contained in the target component.
Display any User positions in the target component.
Displays objects from any catalog (e.g. of guide stars) that has been loaded. If several catalogs have been loaded, all objects are displayed. Use the catalog navigator, opened from the catalog...browse item in the menu bar, to manipulate the display of multiple catalogues.
Displays any offset positions defined in the the offset iterator. The view base button must also be selected to see the science instrument offsets.
The offset display is configured from the view...offset display item on the menu bar. You can choose whether to display the offset sequence tags and the science area at the position selected in the offset list, none or all positions. The science field of view at the currently selected offset position (in the offset iterator list) is displayed in the Position Editor viewer in yellow. (The science field of view at the base position is shown in blue).
Displays the outer patrol field (as large concentric circles) and vignetting pattern of the Peripheral Wavefront Sensors. The two PWFSs are part of the acquisition and guidance unit and their pick-off probes can be swung into the beam upstream of the science instruments and the acquisition camera. The diameter of their outer patrol field is about 14 arcmin (to be confirmed; see more details). The probe arms are mounted on rotary tables and can reach any part of the field.
The position editor viewer contains a model of the PWFSs and their rotary tables. If the PWFS FOV view is selected and you drag the PWFS or the base position, then the probe arms attempt to follow the motion.
![]() The location of
the PWFS vignetting pattern and patrol field depends on the offset position
selected in the offset iterator table. If the WFS is assigned
to a guide star, the vignetting overlay moves for each position in the offset sequence as the
probe moves to remain
pointing at the same RA,dec. The patrol field overlay also moves, corresponding
to the new telescope pointing position. If the PWFS is "frozen" for
that offset step, then it's orientation with respect to the patrol field and
detector is kept
fixed. You can use the offset iterator table for a simple 'playback'
of the whole sequence.
The location of
the PWFS vignetting pattern and patrol field depends on the offset position
selected in the offset iterator table. If the WFS is assigned
to a guide star, the vignetting overlay moves for each position in the offset sequence as the
probe moves to remain
pointing at the same RA,dec. The patrol field overlay also moves, corresponding
to the new telescope pointing position. If the PWFS is "frozen" for
that offset step, then it's orientation with respect to the patrol field and
detector is kept
fixed. You can use the offset iterator table for a simple 'playback'
of the whole sequence.
As the probe arms are nested one above the other, PWFS1 may vignette PWFS2 and both may vignette the science field. The PWFSs are situated about 1.5m above the telescope focal plane and so are out of focus as seen by the science instrument. The position editor viewer shows the vignetting in the telescope focal plane as well as the vignetting at the level of the PWFS. Since the probe arms are out of focus, the vignetting in the telescope focal plane varies from zero at the outer edge of the lightly shaded region to 100% at the inner edge and throughout the heavily shaded region.
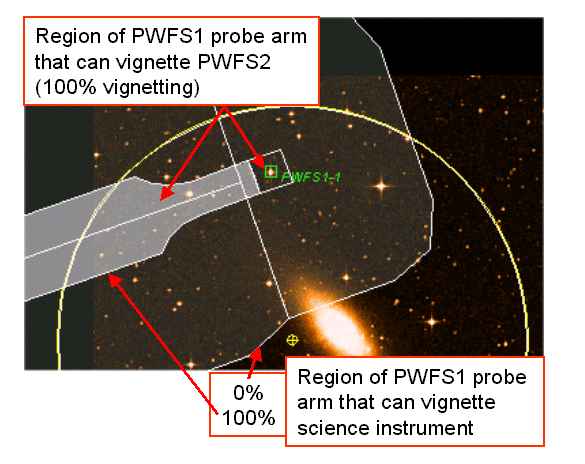
Following are three examples of good and bad PWFS probe positions (click on the small image for a magnified view; note that these screen shots were taken with a cruder representation of the true vignetting pattern):
| OK ... PWFS1 (heavily shaded region) does not vignette PWFS2 | 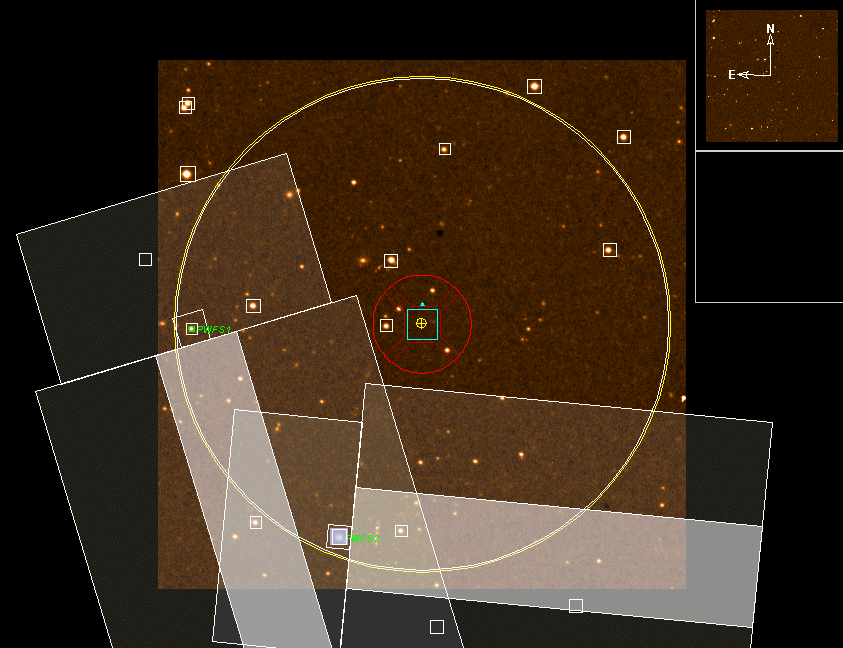 |
| BAD ... PWFS1 partially vignettes science field of view (blue square) | 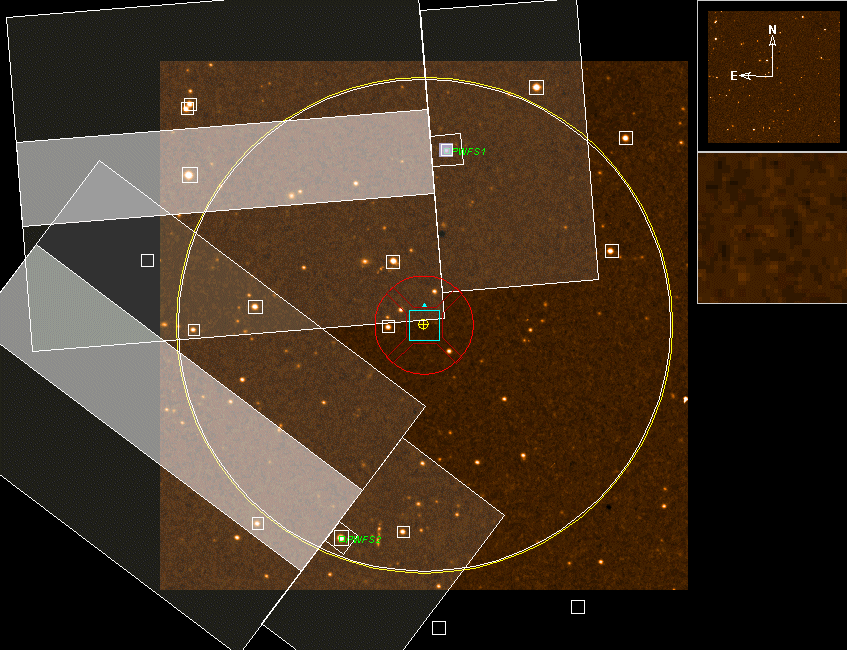 |
| BAD ... PWFS1 vignettes PWFS2 | 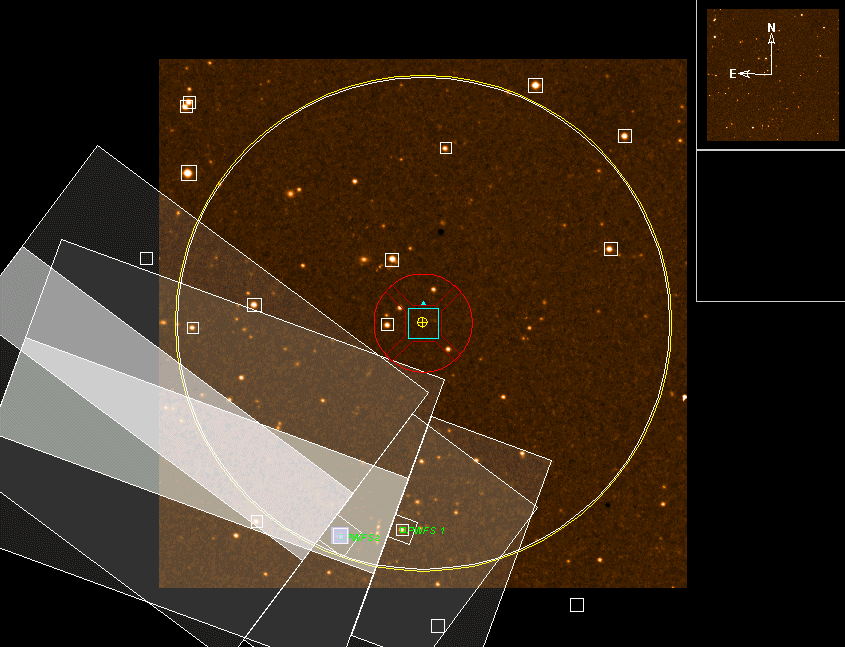 |
![]() At present there is
no automatic checking that the selected PWFS star is within the PWFS patrol field and will not cause
vignetting of the science field or another WFS. You should display the
WFS and sci area fields of view to confirm this visually. There is no check
that the selected star is sufficiently bright for the selected WFS. There is no
check that the probes do not move
outside of their outer patrol field(s).
At present there is
no automatic checking that the selected PWFS star is within the PWFS patrol field and will not cause
vignetting of the science field or another WFS. You should display the
WFS and sci area fields of view to confirm this visually. There is no check
that the selected star is sufficiently bright for the selected WFS. There is no
check that the probes do not move
outside of their outer patrol field(s).
When chopping and nodding (with T-ReCS or Michelle) the PWFS is used in the 'main' beam corresponding to Nod A Chop A (and Nod B Chop B, since the nod is currently required to be equal in amplitude and opposite in direction to the chop). The location of the PWFS probe at the other two positions on the sky (Nod A Chop B and Nod B Chop A) can be displayed by toggling the View, PWFS FOV Display menu items.
Displays the patrol field of the On-Instrument Wavefront Sensor (if the instrument has one). See the relevant instrument's pages for details of the specific vignetting pattern (under the performance and use section...elements of [instrument]).
The OIWFS view is configured from the view...OIWFS FOV display item on the menu bar. You can choose whether to display the vignetting region in outline or solid block of colour. If the OIWFS is not in the focal plane (e.g. NIRI) you can choose whether to include or exclude the partially vignetted region.
As it is part of the instrument the OIWFS patrol field rotates with the science field.
![]() The location of
the OIWFS vignetting pattern and patrol field depends on the offset position
selected in the offset iterator table. If the OIWFS is assigned
to a guide star, the vignetting overlay moves for each position in the offset sequence as the
probe moves to remain
pointing at the same RA,dec. The patrol field overlay also moves, corresponding
to the new telescope pointing position. If the OIWFS is "frozen" for
that offset step, then it's orientation with respect to the patrol field and
detector is kept
fixed. You can use the offset iterator table for a simple 'playback'
of the whole sequence.
The location of
the OIWFS vignetting pattern and patrol field depends on the offset position
selected in the offset iterator table. If the OIWFS is assigned
to a guide star, the vignetting overlay moves for each position in the offset sequence as the
probe moves to remain
pointing at the same RA,dec. The patrol field overlay also moves, corresponding
to the new telescope pointing position. If the OIWFS is "frozen" for
that offset step, then it's orientation with respect to the patrol field and
detector is kept
fixed. You can use the offset iterator table for a simple 'playback'
of the whole sequence.
![]() At present
there is no automatic checking for NIRI that the guide star is within the
OIWFS patrol field. There is no checking that the selected star is sufficiently
bright for the selected OIWFS.
At present
there is no automatic checking for NIRI that the guide star is within the
OIWFS patrol field. There is no checking that the selected star is sufficiently
bright for the selected OIWFS.
Displays the patrol field of the Altair Adaptive Optics Wavefront Sensor.
![]() The location of
the AOWFS patrol field depends on the offset position
selected in the offset iterator table. If the AOWFS is assigned
to a guide star, the patrol field overlay moves, corresponding
to the new telescope pointing position. If the AOWFS is "frozen" for
that offset step, then it's orientation with respect to the patrol field and
detector is kept
fixed. You can use the offset iterator table for a simple 'playback'
of the whole sequence.
The location of
the AOWFS patrol field depends on the offset position
selected in the offset iterator table. If the AOWFS is assigned
to a guide star, the patrol field overlay moves, corresponding
to the new telescope pointing position. If the AOWFS is "frozen" for
that offset step, then it's orientation with respect to the patrol field and
detector is kept
fixed. You can use the offset iterator table for a simple 'playback'
of the whole sequence.
![]() At present
there is no automatic checking that the guide star is within the AOWFS patrol field. There is no checking that the selected star is sufficiently
bright for the AOWFS.
At present
there is no automatic checking that the guide star is within the AOWFS patrol field. There is no checking that the selected star is sufficiently
bright for the AOWFS.
Displays the science instrument's field of view. The FOV depends on the instrument configuration defined in the Science Program instrument component. For example, the science field changes for different NIRI cameras, becomes a slit in spectroscopic modes etc. See the science instrument component for configuration details.
The science field of view at the base position is displayed in the Position Editor viewer in blue. (The science field of view at the currently selected offset position, in the offset iterator list, is shown in yellow).
Displays the 2 x 2 arcmin field of view of the acquisition camera. The AcqCam FOV is fixed in the telescope focal plane and rotates with the science field.
![]()
![]()
Last update June 11, 2009